-
DTG University
-
Printers
-
-
-
- Daily Maintenance for Ri 1000
- Weekly Maintenance for Ri 1000
- Weekly Maintenance for Ri 1000: Head Cleaning Jig
- Monthly Maintenance for Ri 1000
- Video: Replace Encoder Strip
- Video: Replace Left Ink Sump Tank
- Video: Replace Right Ink Sump Tank
- Video: Replace Maintenance Unit
- Video: Replace W1-W2 Ink Supply Units
- Video: Ri 1000 Carriage Replacement
-
-
- How to Connect the Ri 100 to Wireless LAN
- Rh 100 Finisher Operating Instructions
- Rh 100 Finisher Quick Guide
- Ri 100 Installation Guide
- Ri 100 Maintenance Guide
- Ri 100 Operating Instructions
- Ri 100 Quick Guide
- Ri 100 Safety Information
- Ri 100 Setup & Installation
- Ricoh DTG University for Ri 100
- Get Started With Your New RICOH Ri 100
-
-
-
- Application error on startup
- Black Screen
- Colors are wrong or missing
- Head Voltage Error
- Home Carriage Timeout
- Home Table Timeout
- Ink Cartridge Check
- Laser warnings?
- Not printing anything
- Obstruction detection
- Obstruction Sensor Triggered
- Platform didn't lower
- Platform Error
- Print engine not on
- Print Head Calibration failed
- Print is faint or has gaps
- Print Nozzle Clogging
- Prints blurry or smeared
- Video: White ink maintenance & Troubleshooting
- Show all articles ( 4 ) Collapse Articles
-
-
-
Software
-
- Adjusting white underbase
- AnaRIP - Dark Garments
- AnaRIP - Light Garments
- AnaRIP Download
- AnaRIP Hot Folders
- AnaRIP input file handling
- AnaRIP Output
- AnaRIP requirements
- AnaRIP supported file types
- AnaRIP Templates
- AnaRIP View Types
- Calculating cost per print?
- Choke adjustment
- Color contrast adjustment
- How do I enable white ink?
- Image opacity
- Importing graphics into AnaRIP
- Installing AnaRIP
- Managing color profiles in AnaRIP
- Printing too slowly
- Video: Using AnaRIP
- What Is AnaRIP?
- White Highlight Preview in AnaRIP
- Show all articles ( 8 ) Collapse Articles
Connecting Power
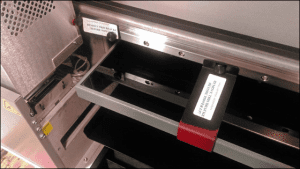
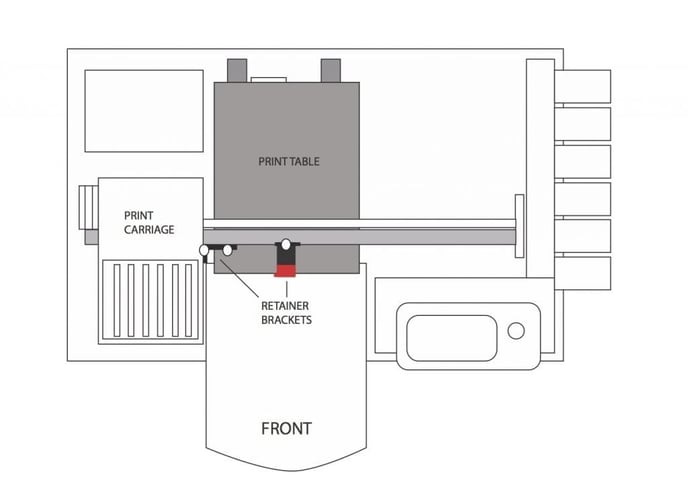
CAUTION: IF THIS IS A NEW PRINTER, REMOVE THE 2 RETAINER BRACKETS ON THE PRINT TABLE AND PRINT CARRIAGE BEFORE POWERING ON OR IT WILL DAMAGE THE PRINTER.
Follow the setup steps in your User Manual, Chapter 2: Startup ofa New Printer
Plug in the provided power cord to a surge protector connected to a wall outlet. AnaJet printer power supplies will accommodate voltages ranging from 90 to 250 volts. Next, plug the power cord into the power entry module in the rear of the printer. Do not plug the USB Cable into the printer or PC at this time.
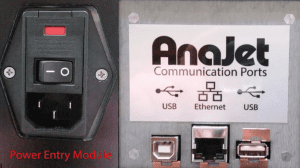
Turn on the power switch on the rear of the Power Entry Module; this will bring power into the printers power supply. Now press the circular <POWER> buttonon the front control panel.
The printer control panel LCD display will light up and the printer is now fully powered on and able to do its automatic ink circulation and maintenance. (Please note due to this two-stage power on sequence that if the printer loses power due to an outage it will not fully power on when the electricity is restored). If you are in an area where your electrical power is inconsistent you may want to invest in an Uninterruptible Power Supply (UPS) that will supply battery backup power to your printer during an electrical outage.