-
DTG University
-
Printers
-
-
-
- Daily Maintenance for Ri 1000
- Weekly Maintenance for Ri 1000
- Weekly Maintenance for Ri 1000: Head Cleaning Jig
- Monthly Maintenance for Ri 1000
- Video: Replace Encoder Strip
- Video: Replace Left Ink Sump Tank
- Video: Replace Right Ink Sump Tank
- Video: Replace Maintenance Unit
- Video: Replace W1-W2 Ink Supply Units
- Video: Ri 1000 Carriage Replacement
-
-
- How to Connect the Ri 100 to Wireless LAN
- Rh 100 Finisher Operating Instructions
- Rh 100 Finisher Quick Guide
- Ri 100 Installation Guide
- Ri 100 Maintenance Guide
- Ri 100 Operating Instructions
- Ri 100 Quick Guide
- Ri 100 Safety Information
- Ri 100 Setup & Installation
- Ricoh DTG University for Ri 100
- Get Started With Your New RICOH Ri 100
-
-
-
- Application error on startup
- Black Screen
- Colors are wrong or missing
- Head Voltage Error
- Home Carriage Timeout
- Home Table Timeout
- Ink Cartridge Check
- Laser warnings?
- Not printing anything
- Obstruction detection
- Obstruction Sensor Triggered
- Platform didn't lower
- Platform Error
- Print engine not on
- Print Head Calibration failed
- Print is faint or has gaps
- Print Nozzle Clogging
- Prints blurry or smeared
- Video: White ink maintenance & Troubleshooting
- Show all articles ( 4 ) Collapse Articles
-
-
-
Software
-
- Adjusting white underbase
- AnaRIP - Dark Garments
- AnaRIP - Light Garments
- AnaRIP Download
- AnaRIP Hot Folders
- AnaRIP input file handling
- AnaRIP Output
- AnaRIP requirements
- AnaRIP supported file types
- AnaRIP Templates
- AnaRIP View Types
- Calculating cost per print?
- Choke adjustment
- Color contrast adjustment
- How do I enable white ink?
- Image opacity
- Importing graphics into AnaRIP
- Installing AnaRIP
- Managing color profiles in AnaRIP
- Printing too slowly
- Video: Using AnaRIP
- What Is AnaRIP?
- White Highlight Preview in AnaRIP
- Show all articles ( 8 ) Collapse Articles
Moving the Ri 3000/Ri 6000/mPower Printer – Shipping
Created:
< Knowledge Base Home
RICOH Ri 3000/Ri 6000/mPower Pre-Shipment Instructions
If your printer is under warranty, you are responsible for arranging and paying for inbound shipping. AnaJet will arrange and pay for outbound shipping.
If your printer is not under warranty, you are responsible for arranging and paying for both inbound and outbound shipping.
Pick up specs:
Ri 3000/mP5 lift gate needed at pick up 230 pounds, 48x48x29
Ri 6000/mP10 lift gate needed at pick up 240 pounds, 48x48x29
To prepare your printer for transit, the following steps MUST be followed:
- – Make sure that your printer is completely filled with ink and the lines have little to no air gaps.
- – Perform a Printhead Clean All Heavy followed by a Nozzle Check.
- – Print the nozzle check on a piece of paper and include this paper inside the box with the printer. Do not wipe the white nozzle check off the table.
- – Release the carriage then use a cleaning applicator to put a coating/layer of waste ink on each of the rubber seals on the maintenance station then secure the carriage. This will ensure an air tight seal and prevent clogging.
- – Completely drain the waste ink tank and clean out the tray underneath the Maintenance Station.
- – Print the attached RMA twice. Place one copy inside the box with the printer and tape the other copy to the outside of the box.
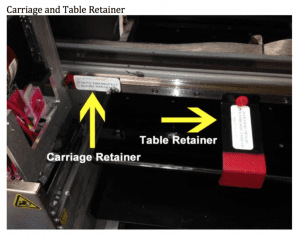
- – Install the carriage and table retainer. These hold the carriage and table in place. (see image below)
- – Do NOT include any ink cartridges, cables, cords or the table hoop as these will not be returned.
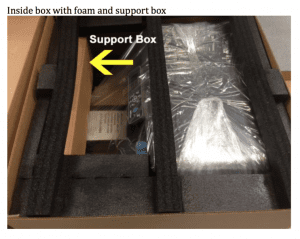
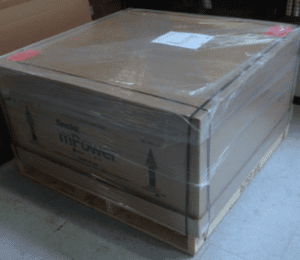
- – Place the printer inside the original box and foam then securely strap it to a pallet. (see image below)
- – The print heads are NOT covered if clogged or damaged.
Jump to: