
Humidity
It is crucial for trouble-free printer operation that the Relative Humidity (RH) requirement is met at all times when the printer is loaded with ink. If the environment is below the specified Relative Humidity the ink will dry more quickly at the Print Head causing nozzles to become clogged. Keep an electronic hygrometer (humidity gauge) near the printer at all times to ensure that the relative humidity is maintained.
Electronic hygrometers are available in electronic stores, department stores or hardware stores, but be sure that they are of a high quality be sure to have them calibrated regularly. If relative humidity falls below 45% at any time, it will be necessary to use a high-powered non-misting humidifier to increase the humidity in the immediate area of the printer. Also keep in mind that it will be much easier to control the environment in a small area rather than a large one.
Unboxing the Printer
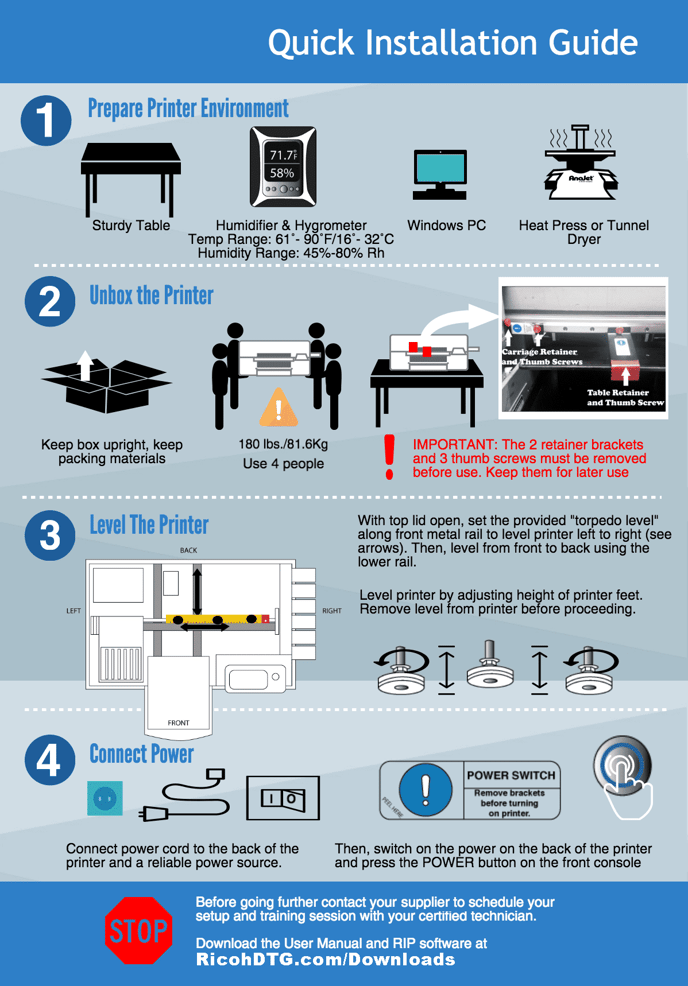
Keep the box upright as indicated by the arrows on the box. Unwrap the packing materials and save in case you need to ship the printer. With the help of 4 people lift the printer from the box onto a sturdy and level table. Make sure NOT to lift the printer by the print table frame in front, lift from both sides, placing hands underneath the printer not under ink bays. The printer weighs 180 lbs. or 81.6 Kg. IMPORTANT: Remove the 2 shipping brackets on the print table and print carriage as shown in the figure below. Keep the brackets and the 3 thumb screws for later use in case you need to ship or move the printer later.
Leveling the Printer
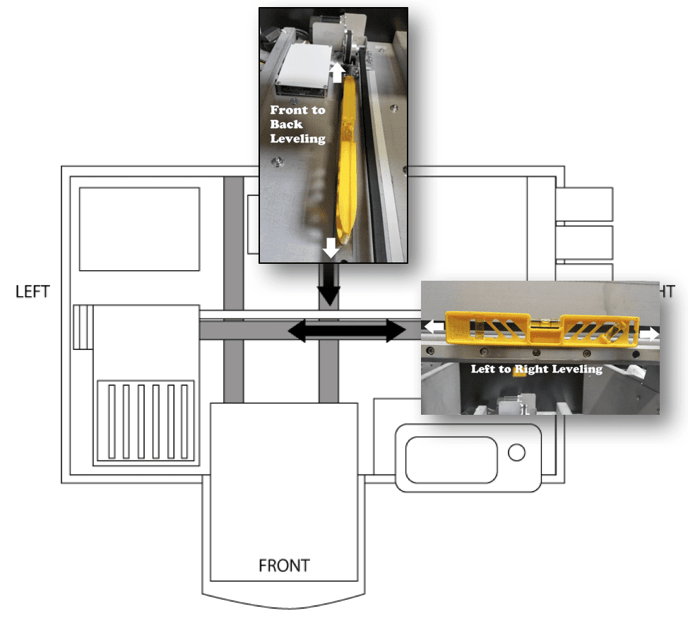
Before the printer is turned on, the printer should be leveled. There are 6 adjustable feet under the bottom casing of the printer that are used level the printer. Turning the feet clockwise lowers the feet towards the ground and turning the feet counter clockwise raises the feet into the printer.
To level the printer on the left to right axis, open the printers top cover and place a 9 or 12 torpedo level on the on the rail. Adjust the left most or right most feet to initially level the printer left to right. Then lower the middle feet to provide stability.
Once the left to right axis has been initially leveled, the printer will need to be leveled front to back.
To level the printer on the front to rear axis, open the printers top cover and place the level on the rail below and behind the print table. Adjust the front or rear feet as needed to level the printer on the rear axis.
Double check the level across the left to right and front and back axis to confirm that printer is still level, then lower the 2 front adjustable feet that are located under the loading table to stabilize the printer. Remember to remove the level from the inside the printer when done so it won't damage the printer when the printer is powered on.
Connecting Cable Connections
Plug in the provided power cord to a surge protector connected to a wall outlet. AnaJet mPowerTM printer power supplies will accommodate voltages ranging from 90 to 250 volts. Next, plug the power cord into the power entry module in the rear of the printer. Do not plug the USB Cable into the printer or PC at this time.
BEFORE TURNING ON, BE SURE YOU HAVE REMOVED THE 2 RETAINING BRACKETS ABOVE! Turn on the power switch on the rear of the Power Entry Module; this will bring power into the printers power supply. Now press the <POWER> key on the front control panel. The printer control panel LCD display will light up and the printer is now fully powered on and able to do its automatic ink circulation and maintenance. (Please note due to this two-stage power on sequence that if the printer loses power due to an outage it will not fully power on when the electricity is restored. If you are in an area where your electrical power is inconsistent you may want to invest in an Uninterruptible Power Supply (UPS) that will supply battery backup power to your printer during an electrical outage.
STOP! - At this point, contact Anajet or your local distributor to scheduleyour technician to finish the installation and fill your inks for the first time. Download the user manual.
Heat Press Setup
Keep Heat Press at least 10ft from printer onto a sturdy table. Having the heat press too close can heat up electrical components and damage them. Always plug the press into a separate outlet that can handle 20amps. DO NOT use the same outlet for both the printer and heat press.
The following items will also be needed for your AnaJet printer operation:
- 12 or 9 inch level (commonly called a torpedo level) for installation of the printer.
- Electronic hygrometer/thermometer (to monitor the relative humidity of the room the printer is operating in).
- AnaJet mPowerTM Digital Garment Printer User's Manual 2.5
- PC computer with Windows XP, Vista, Windows 7, Windows 8 or Windows 10 operating system.
- Graphics software installed in the PC, such as Photoshop, CorelDraw, Photoshop Elements or Illustrator.
- Heat press or textile oven (for heat curing of the ink).
- Adequate supply of garments to print.
- Paper towels.
- Standard 8.5 x 11 copying or printing paper.
- High Volume Low Pressure (HVLP) electric sprayer or other type of sprayer for applying pretreatment for dark garments.