-
DTG University
-
Printers
-
-
-
- Daily Maintenance for Ri 1000
- Weekly Maintenance for Ri 1000
- Weekly Maintenance for Ri 1000: Head Cleaning Jig
- Monthly Maintenance for Ri 1000
- Video: Replace Encoder Strip
- Video: Replace Left Ink Sump Tank
- Video: Replace Right Ink Sump Tank
- Video: Replace Maintenance Unit
- Video: Replace W1-W2 Ink Supply Units
- Video: Ri 1000 Carriage Replacement
-
-
- How to Connect the Ri 100 to Wireless LAN
- Rh 100 Finisher Operating Instructions
- Rh 100 Finisher Quick Guide
- Ri 100 Installation Guide
- Ri 100 Maintenance Guide
- Ri 100 Operating Instructions
- Ri 100 Quick Guide
- Ri 100 Safety Information
- Ri 100 Setup & Installation
- Ricoh DTG University for Ri 100
- Get Started With Your New RICOH Ri 100
-
-
-
- Application error on startup
- Black Screen
- Colors are wrong or missing
- Head Voltage Error
- Home Carriage Timeout
- Home Table Timeout
- Ink Cartridge Check
- Laser warnings?
- Not printing anything
- Obstruction detection
- Obstruction Sensor Triggered
- Platform didn't lower
- Platform Error
- Print engine not on
- Print Head Calibration failed
- Print is faint or has gaps
- Print Nozzle Clogging
- Prints blurry or smeared
- Video: White ink maintenance & Troubleshooting
- Show all articles ( 4 ) Collapse Articles
-
-
-
Software
-
- Adjusting white underbase
- AnaRIP - Dark Garments
- AnaRIP - Light Garments
- AnaRIP Download
- AnaRIP Hot Folders
- AnaRIP input file handling
- AnaRIP Output
- AnaRIP requirements
- AnaRIP supported file types
- AnaRIP Templates
- AnaRIP View Types
- Calculating cost per print?
- Choke adjustment
- Color contrast adjustment
- How do I enable white ink?
- Image opacity
- Importing graphics into AnaRIP
- Installing AnaRIP
- Managing color profiles in AnaRIP
- Printing too slowly
- Video: Using AnaRIP
- What Is AnaRIP?
- White Highlight Preview in AnaRIP
- Show all articles ( 8 ) Collapse Articles
Print Head Clean
A Print Head Clean is performed from the Printer Control Panel under the Main menu. Press the button with the 6 ink channels and select a Print Head Clean. You will see the following menu of options.
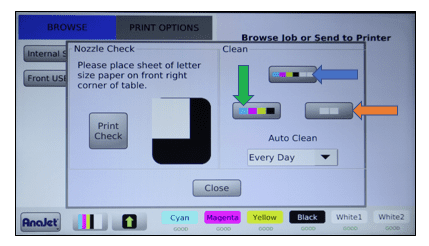
If your nozzle check only shows that the white ink channels are not firing fully then select Clean White Channels, indicated by the button with only two white boxes.
If you need to clean any of the CMYK channels, select the CMYK channel clean indicated by the button displaying the 4CMYK colors.
If you need to clean BOTH CYMK and White channels, select the 6 channel clean button at the top that shows all 6 colors.
When the clean is completed select Close and pop up will disappear. You now need to perform another Nozzle Check to check the status of your print nozzles. If the check is still not good, repeat the Print Head Cleans until it is.
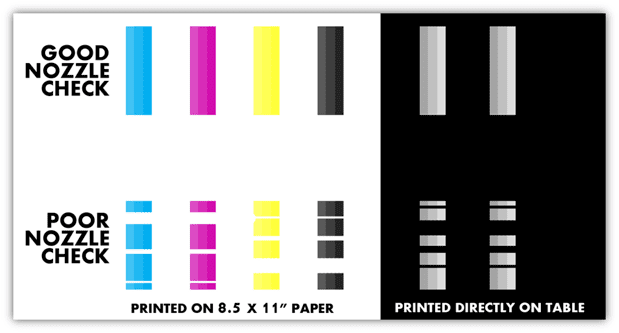
If the Nozzle Check Pattern looks good then you are finished with the initial printer setup.