
What is clogging?
If you notice a drop in the quality of your prints, or your printer is reporting ink supply errors, the most common cause is nozzle clogging.
The easiest way to identify nozzle clogging is by running a nozzle check, if there are breaks in the grid it is considered a clog. There are two types of clogs, minor and major.
If there are just a few missing lines and no ink supply errors on the screen, it is considered a minor clog. Minor clogs are no cause for alarm, they will be encountered every so often and are generally nothing to worry about. These can typically be resolved fairly easily.
If there are a lot of lines missing or the printer is reporting ink supply errors, it is considered a major clog. Major clogs are usually an indication that there is a problem with the user's maintenance or the machine's operation. It is very important to identify the cause and correct it as soon as possible to prevent further clogging. The recovery process can be more involved depending on the severity.
Often clogging creates 988 or/and 990 error codes that will be displayed in the status screen.
What causes clogging?
Clogging can occur on any printhead, but it most commonly associated with white ink. This is because the white ink has a different chemical composition from the colors, since it needs to also serve as a sturdy underbase on dark garments. This is great for print quality, but certain operations are necessary to keep it from settling while still inside the printer.
Most of these operations are automated; the machine runs an automatic clean on the two white heads about every four hours which pushes out the dried ink and replaces it with fresh ink. It also runs a circulation every hour which simply agitates the white ink in the lines.
If these automated procedures are disrupted, the ink will begin to settle in the printheads and the ink supply which will result in clogging issues. This is why it is important to make sure that when there is ink in the lines, the printer is never shut off for more than four hours and there are no errors on screen.
The most common issues that prevent auto maintenance are:
- The printer is shut off. Of course, the machine will need to be powered on to perform its maintenance. Never shut it down for more than four hours without filling the lines with cleaner and properly applying the wet cap to the printhead (instructions below).
- The printer runs out of ink. This is why it is important to always use cartridges that are above 5%, especially when leaving the printer alone.
- The waste ink bottle is full. The waste ink level will be automatically counted by the printer. If this value reaches 100%, the printer will enter an error state. Make sure to empty the waste bottle and reset this value frequently to prevent this.
- Ink cartridges are not inserted. Ink cartridges must always be loaded unless you are filling the lines with cleaner. If cleaner cartridges or no cartridges are inserted, the machine will stop maintenance procedures.
- The printer is in some other error state. The status bar will always tell you if the printer detects an error. We can't list them all here, but if you can't resolve the issue yourself, we recommend contacting us.
Not everything is automated, user maintenance is also important to preventing clogging. The most important steps to prevent clogging:
- Perform manual maintenance weekly. As ink is dispensed during prints and automatic maintenance, it will begin to build up on the underside of the printheads and the maintenance station. This build up will need to be cleared by the operator at least once a week, or as needed depending on use.
- Perform a nozzle check daily. By running nozzle checks at the start of every day and before use, not only will you ensure your image quality comes out best-- you will also be able to catch minor clogs before they become major clogs.
- Shake white cartridges daily. The white ink needs to be agitated in the cartridges as well as the machine. The display will send a reminder to agitate your white cartridges for 50 seconds every day.
How do I resolve clogging?
Step One - Automatic Head Cleaning
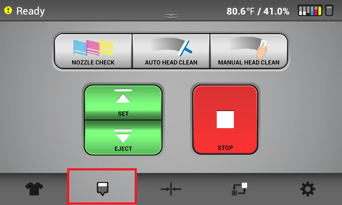
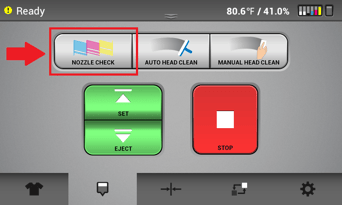
The first step in resolving clogging is to print a nozzle check, which will show you where the clogging is located. Head to the maintenance screen, which is the second tab at the bottom, and select nozzle check. Once printed, you can use it to identify which heads have gaps.
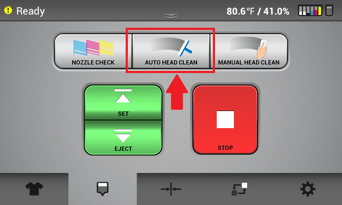
Now that you know where the clogging is, you will want to run a strong head clean on the identified heads.
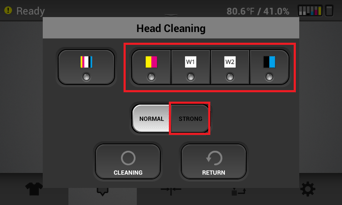
After the strong head clean is completed, print out another nozzle check. If there are still gaps, you will want to repeat this process up to five times total to see if it will improve.
Step Two - Perform Maintenance
If there is no improvement, you will want to confirm that all necessary user maintenance is being performed. Refer to the weekly maintenance guide.
- Make sure that the maintenance station is free of any ink build up. If there is excessive build up, use a cleaning applicator damp with cleaning liquid to clean thoroughly.
- Check underneath the printhead for any signs of dried ink on the nozzles. If there is excessive build up gently wipe the nozzles in one direction with a cleaning applicator damp with cleaning liquid.
CAREFUL: Only wipe once per side of the applicator, so two wipes per applicator. To avoid liquid-related damage, do not wipe more than ten times total. - Run a strong head clean after previous steps, and then run another nozzle check to see if there were any improvements.
Step Three - Flushing the Lines
If there is still no progress, we will need to attempt to break through the clog with cleaner cartridges.
First, you will want to make sure that you have the latest firmware installed. In Version 1.37.2 the cleaner charging process was modified to optimize head recovery, and for this guide we will assume you are running that version.
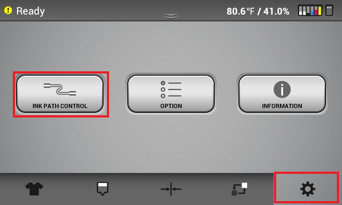
Assuming you're only missing the white nozzles, replace the white ink cartridges with white cleaner cartridges and head to the settings screen, the fifth tab on the bottom.
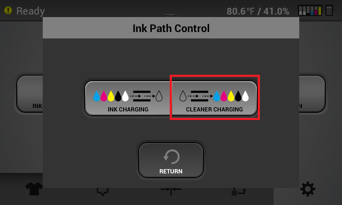
Then, hit 'Ink Path Control', 'Cleaner Charging', and then select the option for whites only.
Once the lines have been completely flushed with cleaner, perform a strong head clean and a nozzle check. You will want to see the full outline of the cleaner without any visible white ink. Repeat this process up to three times to see if the nozzles improve. Continue as needed if there are improvements. If you are able to fully recover, you can refill with white ink at this point.
Step Four - Nozzle Strong Maintenance
If you still have not recovered your nozzles, you will need to utilize the Nozzle Strong Maintenance feature, added in 1.41.0. This will require a carriage cap and cleaning fluid.
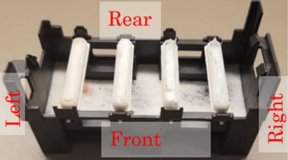
Before proceeding, make sure that the carriage cap is clean. Fill each section with RICOH cleaning fluid, such that each is slightly overfilled.


Next, find the option for 'Nozzle Strong Maint' in your options, accessible on the settings screen.

Then select the channel(s) that are experiencing clogging (typically white) and press 'Next'.


Now, open the top cover and apply the cap filled with cleaning fluid to the bottom of the problem carriage.


Once applied, you can close the top cover.


You will then get a prompt asking for confirmation. When you press 'Start' the printer will begin running the recovery function. This will only take a few minutes. Once finished, remove the carriage cap and perform a strong head clean, then a nozzle check.

If there are no missing nozzles, you can refill the printer with ink and get back to printing. If there are still missing nozzles but noticeable improvements, you can repeat the procedure as needed.
If there is no improvement, you will want to apply the carriage cap overnight with cleaning fluid and look for improvements on the following day.
Step Five - Contact Technical Support
If you are still not able to make any progress, you can always reach out to our technical support team for additional guidance.
Our team can help assist you in recovering or replacing the printhead if necessary, additionally we can investigate the original cause and advise on preventing future clogs.