
What is this error?
The 'Circulation Air Count Over' or 'Service Call 992' means that there is an irregularity with the white circulation operation.
Every hour, the white ink is circulated within the lines and cartridges to keep it from settling and lessens the likelihood of clogs. If there is some disruption in the flow of ink, such as the machine detecting air in the lines which could cause further damage, it will enter this error state.
What causes this error?
Specifically, the printer throws this error when the ink supply pumps are running but flow to the white cartridge is not being detected. Generally, the reason for this is that there are air pockets somewhere in the lines.
The troubleshooting process tends to lead to one of two culprits:
The ink lines are improperly or not fully connected at either end: This is especially common if you have recently replaced your carriage or ink supply unit. If the connections are not fully sealed, air will be sucked into the lines when the pumps are running.There is ink residue blocking either end of the lines: Dried up ink residue can cause issues at the printhead or ink supply level in two different ways.
- If ink has made its way outside of the tube at either side, it could harden and prevent the ring from sealing, allowing air to enter.
- If ink has dried up and solidified inside the tube at either side, it could disrupt the flow. At the ink supply it could prevent the cartridges from setting fully, causing air to be pulled.
How do I resolve this error?
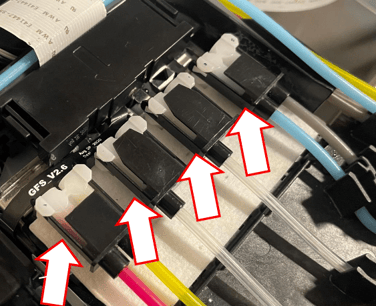
Step One - Check the Ink Needle Port
The simplest thing to examine is the ink needle port inside of the ink supply. All you will need to do to access this is remove the white cartridges and examine the spots shown below.

If there looks to be a lot of ink build-up, you will want to clean these out using a cleaning applicator dampened with cleaning liquid. Be careful and avoid getting any cleaner onto the electrical board above these ports.
After doing so, reboot the printer to clear the error and see if it returns.
Step Two - Check the Carriage Tube Clips
Another easy spot to check is the ink tube clips on top of the carriage. This issue is typically the result of a newly replaced carriage. All you will need to do to access this is release the carriage by selecting 'Manual Maintenance' and then carefully unhook and remove the top cover.
On top, you will see the black clips that guard the tube connections to the printheads. If they are not fully clipped, it means that the ink tubes are not fully inserted. 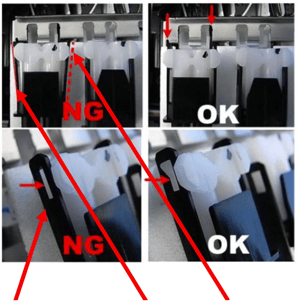
After you have completed the first two steps, reboot the printer to reset the error and see if it returns. Otherwise:
- If you have recently replaced the carriage, continue to step 3.
- If you have not recently replaced the carriage, skip to step 4.
Step Three - Swap Ink Cartridges
If a damaged or defective cartridge cannot set properly in its slot, it could lead to air being pulled into the lines which would produce this error. If this is the case, the first step would be flushing the lines with cleaner to try and clear them of any air pockets.
After clearing the lines, insert a new set of ink cartridges, and fill with ink. Then, reboot the printer to clear the error and monitor it to see if the error returns.
Step Four - Check the Ink Tube Connections
If you have not been able to resolve the issue with the above steps, the solution is more involved. Only attempt this step if the carriage was recently replaced.
Start by releasing the carriage through the maintenance menu, then remove the cover, and unhook and pull back the clips holding the white ink tubes in place. Carefully remove and inspect each of these tubes for signs of ink adhesion on the outside surface.
If there is dried ink on the surface, use a wipe with cleaning liquid to remove it.
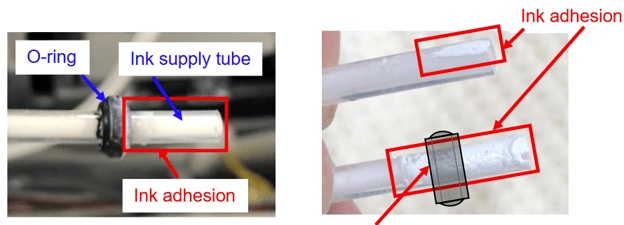
Then fully insert the tubes with the ring still attached, then clip them back in place.
Step Five - Change the Service Call to Warning and Contact Technical Support
If you are still not making any progress, you can set the service call to a warning instead of an error to allow for continued printer function.
To do this, you will need to be on the most recent firmware, then from the options screen enter the printer's service menu by tapping the combination shown below.
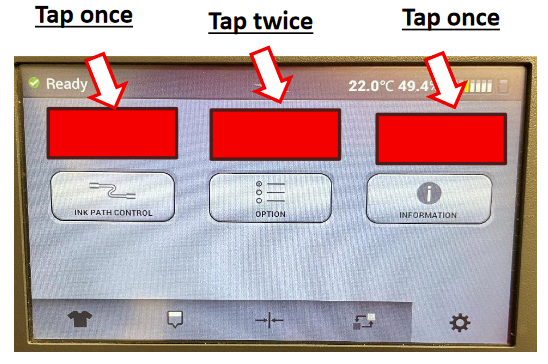
From here, navigate to 'Printer System'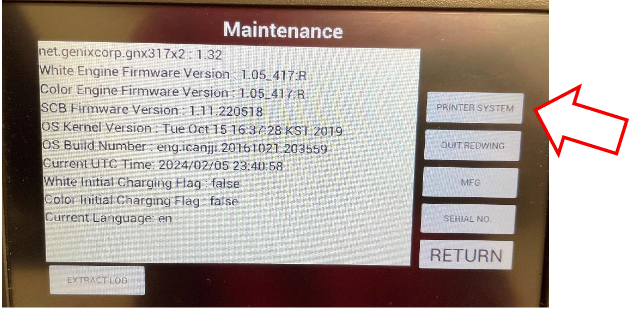
and then 'Change SC to Warning'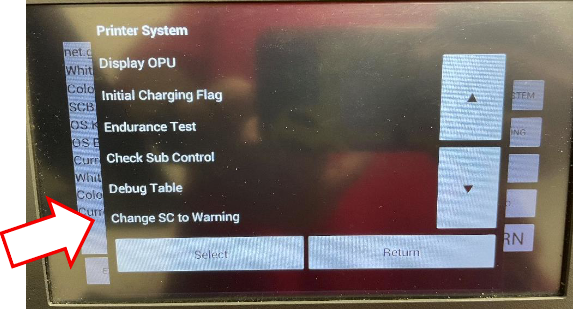
and then select 'Set' to change the 992 to 'Off'
While you can continue to print at this point since the machine will continue to run its maintenance procedures, the error is an indicator of an underlying problem that can cause further damage if left unresolved. Once you are ready, reach out to our technical support team for additional guidance on how to clear the error entirely.
Let our team know what has been attempted so far and they can help advise for further troubleshooting.