
What is this error?
The 'CR ENCODER ERROR' is one of the more common Service Calls that the Ri 1000 can report, primarily because it can be traced back to a variety of different causes.
The error basically means that the printer is running into some issue while attempting to move the carriage, whether that be an obstruction in its path, problems tracking its position, or inhibited movement.
What causes this error?
The point at which the error pops up could hint at the potential cause-- such as during initialization at boot up, while performing regular automated maintenance, or when printing a graphic.
While the troubleshooting steps should all be attempted as the error continues, it's useful to identify the process where it's occurring since it could suggest a starting point:
- Initialization: An error during boot up initialization is most commonly associated with an incorrectly positioned left sump or maintenance station, a dirty or damaged encoder strip, or residue on the filler sensor (pictured later).
- Maintenance: An error during routine automatic maintenance is most commonly associated with residue on the filler sensor (pictured later).
- Printing: An error during printing is most commonly associated with inhibited carriage movement due to build-up or dryness on the guide rods.
We will describe the solutions to these issues in greater detail, feel free to start with suggested steps above but make sure to attempt all steps if the issue persists.
How do I resolve this error?
Step One - Monthly Maintenance
The first step to resolving this error is to conduct the monthly maintenance, specifically cleaning and re-greasing the guide rods as well as cleaning the encoder strip.
Release the carriage on the maintenance screen by pressing 'Regular Maintenance' and then shut down the printer before continuing. It is possible to damage the encoder strip if continuing with the printer powered on.
Guide Rods
You should start with the guide rods, since grease may be accidentally applied to the encoder strip during the process. The guide rods need to be checked on a monthly basis since if they are dry, there will be too much friction for it to smoothly move from side to side.
After applying a carriage cap on the underside of the printheads to prevent possible damage, begin cleaning the rods of any old, excess grease or residue with cleaning applicators or lint free wipes, since too much grease can also cause issues. Move the carriage as needed to make sure that the rods are completely dry. Once done, return the carriage to the middle to begin applying grease.
Be careful not to hit the encoder strip while adding the grease. Add two to three small dabs of grease to each side of both guide rods and use a cleaning applicator to evenly distribute it along them. Remember to move the carriage and add the grease to where it was sitting.
Move the carriage from side to side to spread the grease more evenly. If there is little to no resistance, you can move on to the encoder. Otherwise, add grease as needed. If the carriage feels like it is not moving correctly, check the back to see if it is correctly attached to the belt.
Encoder Strip
If there is residue on the encoder strip, you will need to clean it using a lint-free wipe and alcohol (not cleaning liquid). Wipe in one direction to prevent damaging the encoder strip and repeat this process until it is spotless. Make sure to move the carriage to avoid missing any part of the encoder.
If there is any visible damage on the encoder strip, such as scratches, bends, or tears, it will need to be replaced.
Step Two - Check for Obstructions
A possible cause for this error is that the carriage movement is slowed down or halted due to a collision. Typically, this is the result of a misset left ink sump or maintenance station, or some other obstacle along the track.
The most common answer is the left sump or maintenance station, especially if you have recently removed them-- if positioned too high or peeking up at an angle the carriage will think it has reached the end of the rail after hitting them. Double check to make sure that they are flat, and that the carriage is able to freely move above them.
Step Three - Clean the Filler Sensor
The filler sensor, located above the maintenance station, tracks the feelers that stick out of the carriage as it passes along the right side. If the feelers are not detected, due to residue on the sensor or the sensor itself being out of place, then it will encounter this error.
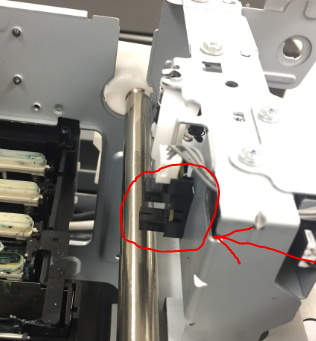
You can use a cleaning applicator with alcohol to remove any obstructions on the sensor. Make sure that when moving the carriage to the right the feelers are reaching out about half-way into the sensor; if they only barely reach the sensor the position may need adjustment. If this is the case, you will want to work with technical support.
Step Four - Contact Technical Support
If you are still not able to make any progress, you can always reach out to our technical support team for additional guidance.
Let our team know what has been attempted so far and they can help advise for further troubleshooting.