Direct-To-Garment printing with your AnaJet is a simple process, but knowing how to adjust your graphics in photoshop may seem difficult and intimidating. Don’t worry, we’re here to help break down the process. Due to the fact that we are printing with a digital printer, optimizing your graphic quality is a crucial step in the DTG business.
You will want to develop the ability to look at a graphic and know what you are dealing with. You can do this by keeping in mind that you will be printing on a matte surface (like fabric) versus a glossy screen (as in how it appears on your computer screen). If you want to get closer to what you see on your screen to be printed, make sure you have a good RIP software like AnaRIP which comes free with mPower printers.
With a good RIP software downloaded and the right mindset, here are several general key points to consider when preparing graphics for your direct-to-garment printer:
Graphic Rules
You always need to print graphics in RGB color modeImage resolution is best at 300 DP
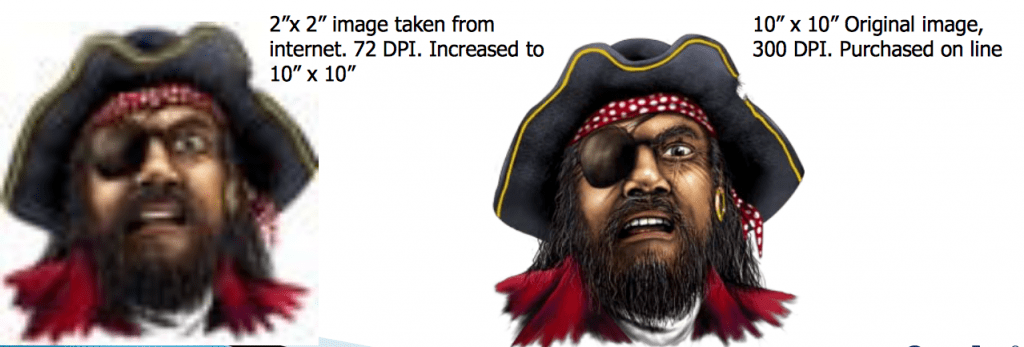
Images at 72 DPI found on the internet will not produce a decent quality image
Lighter image and higher saturation gives you the best printsImages on dark garments need a transparent background
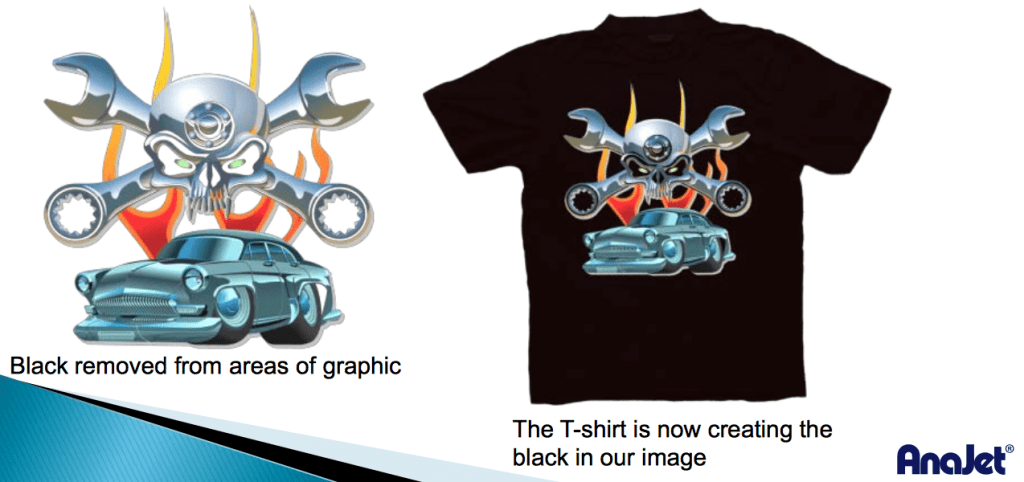
In some cases removing a color like black from a graphic being printed on a black shirt can save ink and have a better result
Graphics should always be saved as a TIFF or PNG Garbage in Garbage out Garbage in Garbage out
Understanding What you are working with
What is resolution?
Resolution refers to the number of pixels in an image. Resolution is sometimes identified by the width and height of the image as well as the total number of pixels in the image. For example, an image that is 2048 pixels wide and 1536 pixels high (2048X1536) contains (multiply) 3,145,728 pixels (or 3.1 Megapixels).
What is a good resolution size?
300 dpi .. true to size. For example, if you had an image that was 2×2 300 dpi but you wanted to print it at 10×10 your image is NOT true to size.
What is a bad resolution size?
72 dpi is not ideal. That drop size is meant for online viewing only due to its faster download speed.
What is the size of my original image?
In Photoshop, go to Image on the menu bar > Image Size. A window box will pop up with the pixel dimensions as well as document size.
If the resolution is low can I just change it?
No, changing the resolution does not fix the image to look sharp.
What should I look for when finding graphics?
High-resolution, true to size, you can find these easily in stock photography/graphic websites
Color Mode
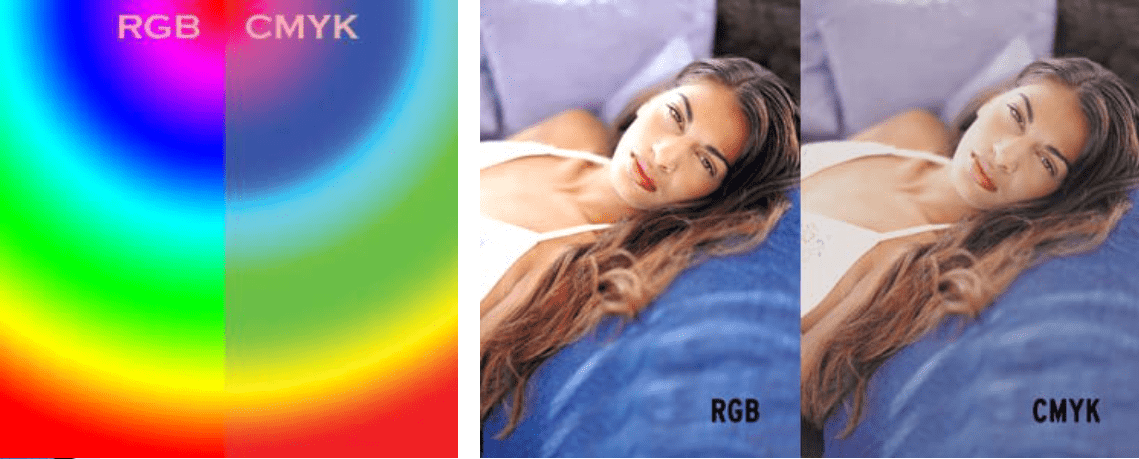
Images always need to be printed and saved as RGB color
How can I tell if its CMYK or RGB? Go to Menu Bar > Image > Mode > **there will be a check mark next to the color mode it is currently set to.
How do I change a CMYK image into RGB? Go to Menu Bar > Image > Mode > **Select RGB
What happens if I print in CMYK? We highly recommend saving the format in PNG which cannot be saved in CMYK.
TIP: Work your file in CMYK first, then save it as a RGB when done.
How To Remove A Background
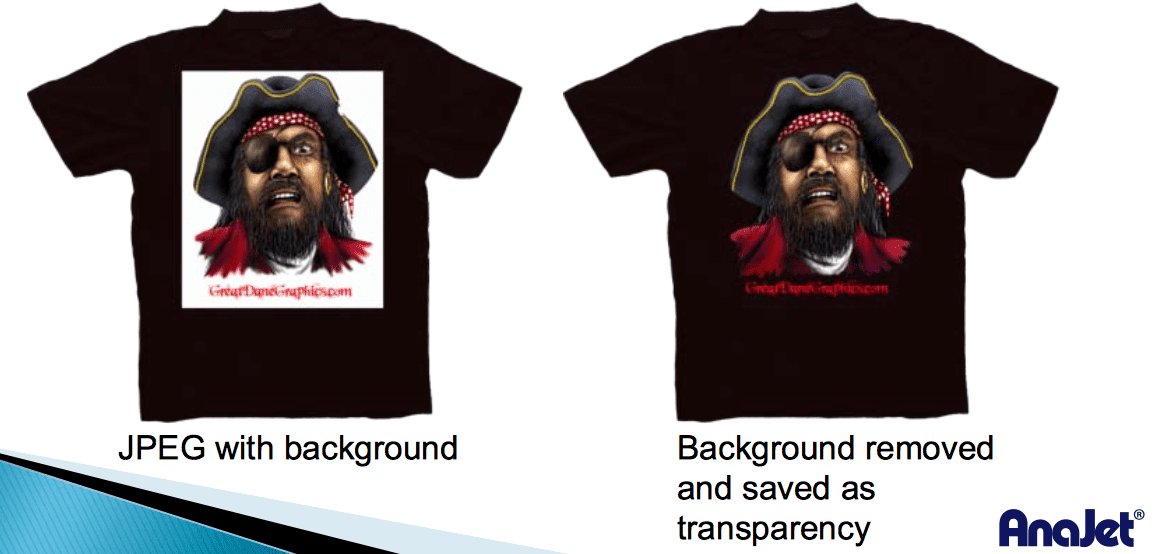
Removing a background from an image is required for printing on dark garments. When a file comes to you as a JPEG image it will have a white background. When printed onto a garment you will end up with a large white box with the image inside. We dont want this, the graphic alone is what we need. To do this the background must be removed and a transparency created. Watch this video.
How to Remove a Color from an Image
Depending on the graphic a good trick to use is knocking out a color. If you are using a black shirt for instance and you have some solid areas of black in the image, removing the black will let the shirt color create that color for you. You will never get a black printed in ink as black as the garment, this looks better and also saves you money by using less ink. Everyone has more than likely seen the AnaJet Pirate graphic. This is a great example of letting the shirt create the color for you.
Color Tips And Adjustments
What you see on your monitor is a totally different world to what we are going to print our graphic onto. A matt surface, this is going to mute our color and darken our image due to its nature. Making a few color adjustments can really bring your print to life
The example below displays what happens when you adjust saturation, brightness, and contrast.

What can you do to make you image print more vibrant and get the best quality
The first step to making color adjustments is increasing the color saturation. This will be done to each color value in the image so we can fine tune it.
The lightness of the image will also be adjusted. We need to adjust the lightness to compensate for the matt surface making our print darker than it should be.
File Saving
Once your graphic is completed and ready to print it is important that the file is saved properly. The best file format to save your graphic with is a TIFF. TIFF files do not compress your image losing quality, when you save a file as a JPEG the image in automatically compressed and you lose quality. TIFF files also keep you background transparent, they are one of the only file formats the support transparencies. If you removed a graphics white background and saved it as a JPEG the graphic will now have a white background again. Make sure when you save your file you select the save transparency option when prompted. If you dont, white background again
During the TIFF saving options also turn off any ICC Profiles that may be associated with the graphic.
Learn how to do MORE with your AnaJet printer by watching our Tips & Tricks Tutorials!